Flooring: part 3 of 4
The floor replacement job was going slowly, but surely. With a few boards missing, I had a thought that seemed perfectly reasonable at the time: why not temporarily hook up the dishwasher? Every hour spent washing dishes by hand is an hour not spent on the actual renovation. Solid logic.
The water supply connection was fine. The wastewater connection was supposed to be provisional. Turned out to be a bit too provisional. I did a reasonable thing of being nearby when the dishwasher was on. Dishwashers pump out water at least twice during a standard cycle. The initial rinsing went fine. But when the cycle was nearly finished and the machine began dumping water again, I heard the splashing and made it across the kitchen in time to grab the hose and hold it in place for the rest of the drain.
Quick reaction. Maybe half a litre escaped. Actually, probably closer to two litres. The mineral wool under the open section of floor had a nice wet patch, and I had a new sub-task to deal with.
How bad is it really?
Rockwool (mineral wool) is pretty forgiving when it gets wet. Rockwool holds its structure and can be dried out and reused. But you do have to actually dry it, leaving wet insulation under a floor is a fast track to mould.
How to dry floor insulation
Step 1: pull out the wet batts
Fortunately I already had the floor open, so this part was easy. Rockwool pulls out in sections without much fuss. I took the affected pieces and laid them flat. Not stacked - airflow is what you want. On a sunny day, I would take them outside and they would be dry in an hour. No such luck, they stayed inside.
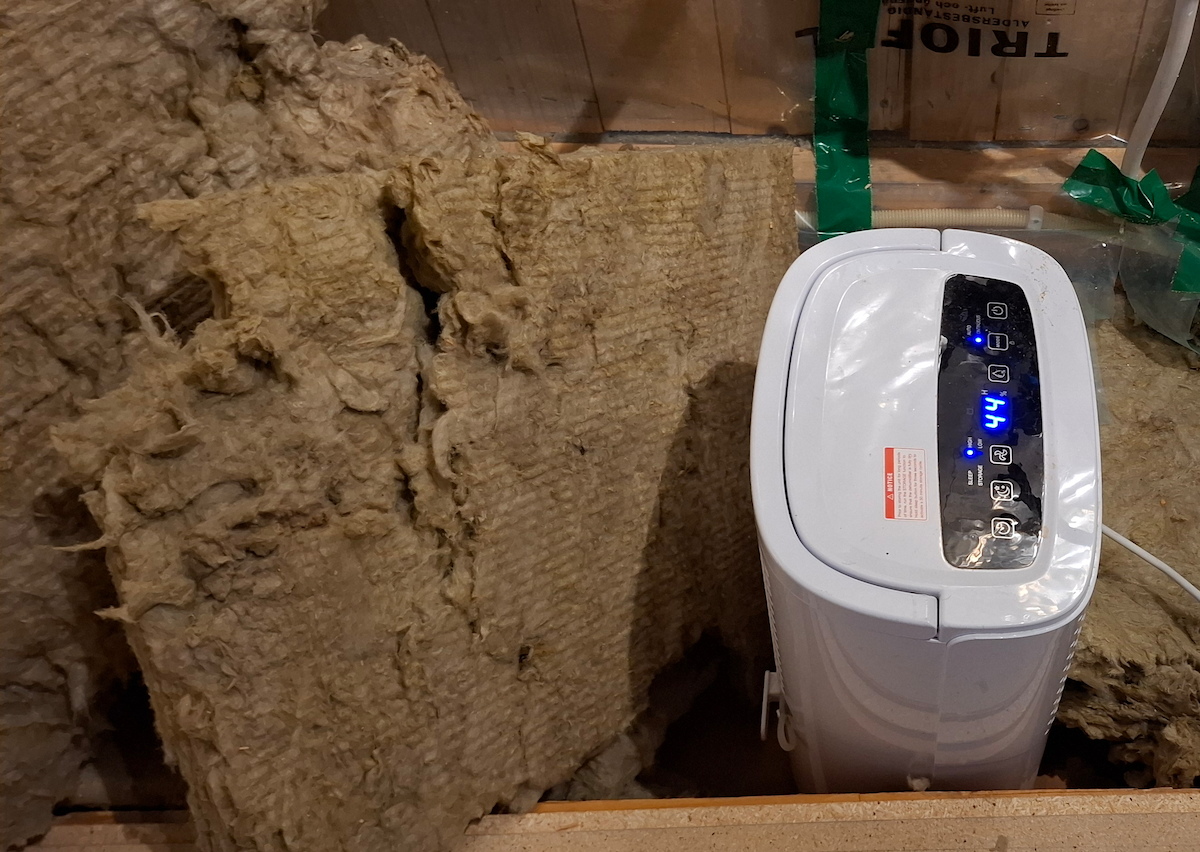
Step 2: dry the joist bay
Even with the insulation out, the timber underneath was damp. I ran a dehumidifier right next to it and the pile of wet wool. If you don’t have one, they can be hired. Larger versions are used to dry flooded houses. Mine is not an industrial type - just the regular home model that’s useful in rainy autumns of UK and Sweden. Good enough for a small flooding.
Move some air through. I used my shop vacuum - most can work as blowers if you connect the hose to the exhaust port instead of the intake. The air is also warm after going past the 1000W motor, which helps. I used it in short burst, while the dehumidifier was running for hours.
The dehumidifier shows air humidity. I don’t think the meter is accurate, wouldn’t trust the absolute value, but I didn’t need it. Trend is important. For many hours, the number was constant. When it started dropping, I knew I was getting somewhere. A moisture meter would be perfect here - you’re aiming for timber moisture content below around 18–20% before closing up. I don’t have one, so I kept drying until I couldn’t see and feel the moisture and the dehumidifier meter stopped dropping, and then a few hours more.
Step 3: put everything back
Obviously.
What if you can’t reach the insulation?
I got lucky having the floor already open. If the boards are down and you know some water got below them, the best thing would be to get the floor open and remove the mineral wool like I did.
What if it’s not reasonably possible? What goes below is a speculation - haven’t tested it, but that’s what I would do. Get some opening over the affected area - cut a section or at least drill with a hole saw. Blow a lot of air through it for a few days. Check regularly. I would definitely get a moisture meter in that case. It’s cheap. Dealing with the underfloor mould after you installed the floor, cabinets and appliances - isn’t.
Lessons learned
Total time added to the project: about two days of waiting, maybe an hour of actual work. I was lucky I had the dehumidifier.
Rockwool fibres are itchy. Wear gloves. Then wash your hands, because the fibres got through the gloves. Then shower, because somehow they got on your shoulders, legs and perhaps some unmentionable places.
The kitchen is now back to normal - the boards, the panels on top of them and the cabinets. And the dishwasher stands on a droppbricka - a Swedish standard drip tray that channels any leaked water forward where you’ll see it, rather than letting it flow out of sight. Required by the Säker Vatten industry standard and a good idea anyway (there’s one under a fridge too). The wastewater hose is clamped properly.
And the dishes got done during the renovation, which was the whole point - so I’m calling it a qualified success.